Dear Visitors Good
Day
The computers which communicate each other are using a
language or common language. In computer terminology it is called Protocol. The
default protocol for windows xp is called Transmission Control Protocol /
Internet Protocol (TCP/IP). Let us Discuss TCP/IP concepts and configuration
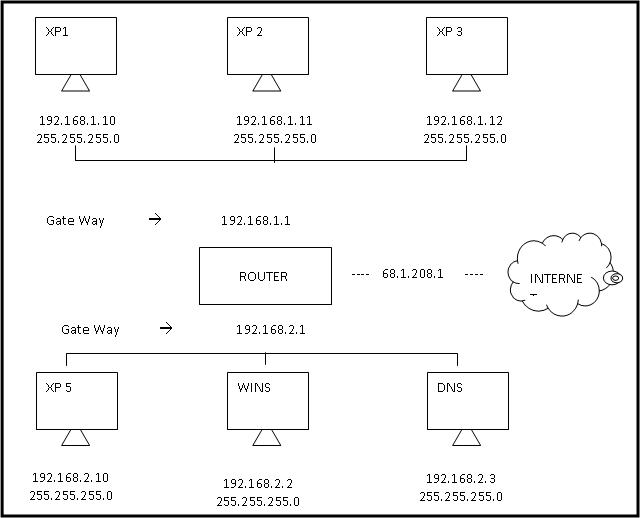
In this Diagram we have several computers which TCP/IP have
been installed. Each computer has its own IP address. This process is very
similar to using a telephone. In Telephone each person wants to communicate
with each other must have their own unique telephone number.
A
telephone number is divided into two parts. The area code and the phone number.
The area code defines the part of the country that we live in and the phone
number is their own unique number. Similarly an IP address is divided into two
pieces called a Network and a host.
The host name is a number, which defines our computer on the
network. We can identify the host and networks through its number that is
255.255.255.0. It is therefore called default subnetmask. This Subnetmask had
been derived from their specific IP Address Classes. There are Three IP Address
Classes which basically use. Thee IP Address Class are as follow.
1). Class
A:
This
is the First IP Address Class. It begins from 1 à
126 . 0 . 0 . 0
It
has 126 Networks and 16,277,214 Hosts. It mean that in this Class we connect upto 16,277,214 computers.
Its
default Subnetmask is: 255.0.0.0. Where
255 Indicates Network and 0.0.0 Indicates Hosts.
2). Class
B:
This
is the First IP Address Class. It begins from 128 à 191 . x . 0 . 0
It
has 16,386 Networks and 65,534 Hosts. It mean that in this Class we connect upto
65,534 computers.
Its
default Subnetmask is: 255.255.0.0. Where
255.255 Indicates Network and 0.0 Indicates
Hosts.
-------------------------------------------------------
-------------------------------------------------------
-------------------------------------------------------
Sponsor:
 |
| Easy Job Easy Money |
3). Class
C:
This
is the First IP Address Class. It begins from 192 à 223 . x . x . 0
It
has 2,097,122 Networks and 254 Hosts. It mean that in this Class we connect upto
254 computers.
Its
default Subnetmask is: 255.255.0.0.
Where 255.255 Indicates Network and 0.0 Indicates
Hosts.
Private IP Address / Networks
Private
Networks are the IP Addresses which can be used by any person. These IP
Addresses do not need to buy. While the other IP Addresses are available by
ISPs. Private Networks are available in all three classes
Class A: 10.0.0.0 TO 10.255.255.255 default
subnet mask: 255.0.0.0
Class B: 172.16.0.0 TO 172.31.255.255 default subnet mask: 255.255.0.0
Class C: 192.168.0.0 TO 192.168.255.255 default subnet mask: 255.255.255.0
So we can get IP Addresses from
these three classes to uniquely identify our computer on the network. However
most of the IP address had already been taken by the Governments, Large
Companies, ISPs etc. The Internet assigned the class A, B, C address has
private addresses that can be used in a home network or in small business
office. Because the routers on the Internet has been trained to filter out
private IP Address. So these computers would have to access the Internet
through a proxy server or network address translation server (NAT), that does
have the Internet connections. In our example we used the class C IP addressing
which also called 192.168.1 Network segment. The Network in the diagram is
192.168.2.
We can see the IP Address that have
been assigned to our computer by using a command called IP configuration or
ipconfig shortly. To check the IP Address of a computer
Go to command prompt à Type ipconfig and
press Enter. It will display our basic IP configuration.
We use the default gateway as the gate way. It
is a door into the Router or Server.


